Getting Started
Classic
Logging into your Placester Account [Classic]
Requesting an IDX Integration [Classic]
Editing Your Contact Details [Classic]
Changing Themes and Colors [Classic]
Adding Images to your Home Slideshow [Classic]
Adding a Favicon [Classic]
Linking Social Networks [Classic]
Adding Certification Logos to the Footer of your Site [Classic]
Changing your Global filter settings [Classic]
Using Basic Lead Capture [Classic]
Creating a Blog Post [Classic]
Creating Advanced Area Pages and an Area Page Index [Classic]
Creating a Page [Classic]
Adding a Logo [Classic]
Codeless
Getting Started Checklist
Requesting an IDX Integration [Codeless]
Logging into your Placester Codeless Account [Codeless]
Image Dimension Guide [Codeless]
Changing your Global filter settings [Codeless]
Editing Your Codeless Contact Details [Codeless]
Adding Images to your Home Slideshow [Codeless]
Featuring Listings on your Home Page [Codeless]
Adding Certification Logos to the Footer of your Codeless Website [Codeless]
Adding a Favicon [Codeless]
What is Codeless?
Updating Classic to Codeless Website
Non IDX Website
Social Feed ( Codeless )
Notification System in the Admin Panel
How to add JS Code to your Placester Website ( Codeless )
The Codeless Design Library and Design Switching
Placester's Web App
All Things IDX
Classic
TREC Requirements [Classic]
RightSignature Cheat Sheet
Adding Your License Number to Your Site [Classic]
Adding Multiple IDX feeds to your site [Classic]
Map Search [Classic]
Natural Language Search [Classic]
Selecting Search Forms [Classic]
Featuring Listings on your Home Page [Classic]
Basic Areas and Creating an Areas Index Page [Classic]
How Placester Handles 1/4, 1/2 and 3/4 Baths [Classic]
Codeless
How to fill out your IDX Documents on RightSignature.com
IDX Process: FAQ's
TREC Requirements [Codeless]
MLS Recommendations/ Updates
IDX Manager [Codeless]
Customizer: Requesting an IDX Integration [Codeless]
Adding Multiple IDX feeds to your site [Codeless]
IDX Support Fee
IDX Integration Removal
Setting Priority on Listings
Account, Subscription & Billing
Codeless
Updating Account Email
Placester Mobile App
Hiring a Creative Assistant Using On-Demand
Account Reactivation
Plan and Billing: Invoices & Accessing the Usage Trail
Updating Payment Details
How to Capture Leads
Customizing your Website
Classic
Custom Domain
How and Where to Purchase a Custom Domain
Pointing your Custom Domain to your Placester Site [Classic]
Editing your Placester Subdomain [Classic]
Forwarding Additional Domains to Your Website [Classic]
Mapping Your GoDaddy Domain to Placester (New User Interface) [Classic]
Mapping your Network Solutions domain to Placester [Classic]
Mapping your Register.com domain to Placester [Classic]
Mapping your Wix Domain to Placester [Classic]
Mapping your iPage Domain to Placester [Classic]
Mapping your Domain.com domain to Placester [Classic]
Mapping your Bluehost Domain to Placester [Classic]
Mapping your Name.com Domain to Placester [Classic]
Mapping your HostGator domain to Placester [Classic]
Mapping Your Domain vs. Forwarding With Masking [Classic]
Mapping your .REALTOR Domain to Placester [Classic]
Mapping your eNom domain to Placester [Classic]
Common Domain Mapping Issues & How to Resolve Them [Classic]
Mapping your DreamHost domain to Placester [Classic]
Mapping your Google Domain to Placester [Classic]
Mapping your Hover domain to Placester [Classic]
Mapping your Namecheap domain to Placester [Classic]
Mapping a Subdomain to your Placester Site [Classic]
Pages, Menus & Posts
Using the Featured Listings Page Template [Classic]
Editing an Existing Blog Post [Classic]
Adding Photos to Pages and Posts [Classic]
Editing Your Menu [Classic]
Adding Featured Content Tiles [Classic]
Adding a blog post to a category [Classic]
Scheduling Blog Posts [Classic]
Choosing Testimonial Featured images [Classic]
Page Templates [Classic]
Editing an Existing Page [Classic]
Using Formatting Options on Pages and Posts [Classic]
Adding Videos to Pages and Posts [Classic]
Advanced Page Editing [Classic]
Creating a coming soon page [Classic]
Adding HTML to a Page [Classic]
Adding a Menu Item that links to a Custom URL [Classic]
What to Include in your About page [Classic]
Home Valuation Page [Classic]
Creating a Custom Landing Page [Classic]
Creating a Testimonials Page [Classic]
Theme Guides
Sedona Theme Guide [Classic]
Chicago Image Dimension Guide [Classic]
Franklin Theme Guide [Classic]
Toronto Theme Guide [Classic]
Phoenix Theme Guide [Classic]
Beacon: Image Dimension Guide [Classic]
Wilshire: Image Dimension Guide [Classic]
Plymouth Image Dimensions Guide [Classic]
How Many Featured Listings and Blog Posts Are Displayed on Each Theme's Home Page? [Classic]
Fremont Theme Guide [Classic]
Highland Image Dimensions Guide [Classic]
Newbury: Image Dimension Guide [Classic]
Recommended Logo Sizes for Each Theme
Lexington: Image Dimension Guide [Classic]
Best Practices
What Should My Slideshow Captions and Links Be? [Classic]
What's Important To Feature In Your Menu [Classic]
Adding your Google Analytics Tracking Code [Classic]
Adding your Google AdWords Conversion Label and ID [Classic]
Adding a Video Link to Your Home Slideshow [Classic]
What To Do After Your Site Is Live [Classic]
How and Why to Add Excerpts to Pages [Classic]
Adding a Facebook Pixel to your Placester Site [Classic]
Submitting your Sitemap to Google
Site Verification for Google, Pinterest, and Bing [Classic]
Adding a Meta Description & Meta Title to your Home Page [Classic]
Adding a Meta Title & Meta Description to Pages and Posts [Classic]
Pro Tips
Writing Your First Blog Post [Classic]
How to Embed a Google Calendar onto your Placester Site [Classic]
Selecting Great Slideshow Images and Where to Find Them [Classic]
How To Create a "Join our Team" Page [Classic]
How to Use Social Networks for Real Estate [Classic]
Adding Social Networks ( Classic)
Which Lead Capture Setting is Best For You? [Classic]
How to optimize SEO on your Placester Site
Removing "For Rent" From Your Search Bar [Classic]
Tips and Resources for Cropping and Resizing Images [Classic]
Sharing Blog Posts on Social Media [Classic]
How to Clear Your Cache [Classic]
How Can I Drive Traffic To My Site?
Account
Codeless
Pages, Menu and Posts
Creating a Testimonials Page [Codeless]
Managing Property Details Page
Integrating Your Real Satisfied Account [Codeless]
Creating new testimonial [Codeless]
Accessibility Widget [Codeless]
Open Houses- Module, Widget and Page Template
Adding a Menu Item that links to a Custom URL [Codeless]
Scheduling Blog Posts [Codeless]
Home Valuation Page [Codeless]
How to create an About Page [Codeless]
Adding Modules to Pages, Areas, Agents, Blog post, Offices and Testimonials
Create and Manage Agent Groups in your Agent Index page
Custom pages for recent sales/open houses (Codeless)
Market Data on Area Pages
Sold Listings
How To Hyperlink Text And Images
Adding a Blog Post to a Category [Codeless]
Using Featured Listings Page Template [Codeless]
Advanced Page Editing [Codeless]
Map Search ( Codeless)
Codeless Coming Soon Listing Page [Codeless]
Creating Advanced Area Pages and an Area Page Index [Codeless]
Creating a Custom Landing Page [Codeless]
Choosing Testimonial Featured images [Codeless]
Editing an Existing Blog Post [Codeless]
Adding a Button to a Page [Codeless]
Creating a Contact Page ( Codeless )
Property Landing Page
Editing Your Navigation Bar [Codeless]
Using Formatting Options on Pages and Posts [Codeless]
Adding Your Facebook App ID [Codeless]
Switching Website Design [Codeless]
Adding Featured Content Tiles [Codeless]
Page Templates [Codeless]
Tips and Resources for Cropping and Resizing Images [Codeless]
Custom Domain
How and Where to Purchase a Custom Domains [Codeless]
Common Domain Mapping Issues & How to Resolve Them [Codeless]
Pointing your Custom Domain to your Placester Site [Codeless]
Forwarding Additional Domains to Your Website [Codeless]
Mapping Your Domain vs. Forwarding With Masking [Codeless]
Editing your Placester Subdomain [Codeless]
Nameservers vs DNS Settings
Mapping your HostGator domain to Placester [Codeless]
Mapping your Register.com domain to Placester [Codeless]
Mapping your DreamHost domain to Placester [Codeless]
Mapping your iPage Domain to Placester [Codeless]
Mapping your Domain.com domain to Placester [Codeless]
Mapping your Hover domain to Placester [Codeless]
Mapping your Google Domain to Placester [Codeless]
Mapping your Network Solutions domain to Placester
Mapping your Wix Domain to Placester [Codeless]
Mapping a Subdomain to your Placester Site [Codeless]
Mapping your Name.com Domain to Placester [Codeless]
Mapping your .REALTOR Domain to Placester [Codeless]
Mapping your Namecheap domain to Placester [Codeless]
Mapping your eNom domain to Placester [Codeless]
Mapping your Bluehost Domain to Placester [Codeless]
Mapping your CloudFlare domain to Placester [Codeless]
Font Style and Size
Leveraging Placester's Simple CRM
Classic
Viewing and Editing Leads
Manually Adding a Lead [Classic]
Removing a Lead [Classic]
Editing your Leads individually and through Bulk Actions [Classic]
Viewing Your Leads [Classic]
Lead Management
Exporting Leads [Classic]
Managing Duplicate Leads [Classic]
What Can Site Visitors Do With an Account? [Classic]
CRM: Managing Custom Views [Classic]
Creating Saved Searches for your Leads [Classic]
Routing Leads From Other Sources to Your Placester Account
Importing Leads [Classic]
How to Add Tags to Leads and Contacts [Classic]
Creating Groups
Adding a Note to a Lead [Classic]
Creating / Managing Tasks (In Leads) [Classic]
How Leads Can Create Saved Searches [Classic]
Using Plans
Creating a Custom Signature [Classic]
Editing a Plan Email Template [Classic]
Creating and Managing Your Email Blasts [Classic]
Editing a Plan [Classic]
Adding single or multiple leads to a plan [Classic]
Creating a New Email Template [Classic]
Creating a New Drip Campaign [Classic]
Broker Features
Codeless
Viewing Your Leads [Codeless]
4.0 Editing your Leads individually and through Bulk Actions [Codeless]
Manually Adding a Lead [Codeless]
4.0 Removing a Lead [Codeless]
Importing Leads [Codeless]
Managing Duplicate Leads [Codeless]
Exporting Leads [Codeless]
4.0 Adding a Note to a Lead [Codeless]
How to Add Tags to Leads and Contacts [Codeless]
Creating Saved Searches for your Leads [Codeless]
How Leads Can Create Saved Searches [Codeless]
Editing a Plan [Codeless]
Creating a New Email Template [Codeless]
Adding single or multiple leads to a plan [Codeless]
Autoresponders
Creating and Managing Your Email Blasts [Codeless]
Creating a New Drip Campaign [Codeless]
What Can Site Visitors Do With an Account? [Codeless]
CRM: Managing Custom Views [Codeless]
New Placester CRM
SEO Capabilities
Codeless: Manual assigning of Leads to Agents
Setting up Integrations
Classic
Codeless
Accessing RealSatisfied Account
Linking Social Networks [Codeless]
What is Zapier?
How to Integrate Your Placester Account With Zapier
Integrating Your Local Logic Account
Follow Up Boss - Placester Integration
Integration: Custom API
TotalBrokerage - Placester Integration
Advanced Website Customization
Classic
Lead Text Notifications Using Gmail [Classic]
Embedding A PDF or File To A Page [Classic]
Custom pages for recent sales/open houses [Classic]
Adding a GIF To Your Home Slideshow [Classic]
Tricks for Speeding up a Slow Website [Classic]
Adding Facebook Messenger to your site [Classic]
Adding a Chat Widget to Your Site [Classic]
Adding a Google Maps location to your Contact page [Classic]
Adding a Logo to Your Site's Footer [Classic]
Adding Google Tag Manager [Classic]
Codeless
Search: Autosuggest Results
Placester Live Chat Feature
Embedding A PDF or File To A Page [Codeless]
Adding Google Tag Manager (Codeless)
Site Verification for Google, Pinterest, and Bing [Codeless]
Lead Text Notifications Using Gmail [Codeless]
Adding Animations to Your Design Modules in Codeless
Overlay management
Custom Property Page Banner
How to Resize and Crop Headshots [Codeless]
Custom Banner
Sign In/ Sign Up Forms
Cookie Banner
Advanced Broker Customization
Classic
Creating an Agents Page [Classic]
Creating an Agents Roster Page on Your Office Site [Classic]
How To Order Agents within your Agent Index Page [Classic]
Creating an Office Page using Customizer [Classic]
Codeless
NAR Edition
General
NAR Edition: Editing the About page
NAR Edition: Global filters
NAR Edition: Adding a Testimonials Page
NAR Edition: Blog Posts
NAR Edition: Pointing Your Custom Domain To Your Placester Site
NAR Edition: Adding Certification Logos to the Footer of Your Site
NAR Edition: Chicago vs. Highland
NAR Edition: Viewing Your Slideshow
Highland Theme
NAR Edition's Highland Theme: Editing Contact Details
NAR Edition's Highland Theme: Featured Listings
NAR Edition's Highland Theme: Editing An Area Page
Chicago Theme
Other Topics
Compliance
Customizer
Customizer: Creating a Blog Post [Codeless]
Adding a Facebook Pixel to your Placester Site (Codeless)
Customizer: Adding your Google Analytics Tracking ID, AdWords Conversion Label and ID [Codeless]
Customizer: Using Custom Lead Capture[Codeless]
Customizer: Adding a Chat Widget to Your Site [Codeless]
Customizer: Editing an Existing Page [Codeless]
Customizer: Mapping your GoDaddy Domain to Placester [Codeless]
Leveraging Video Modules on Your Codeless Website
How to add your Logo to the Header & Footer [Codeless]
Customizer: Adding HTML to a Page [Codeless]
Customizer: Creating a New Page [Codeless]
Customizer: Adding a Meta Description & Meta Title to your Home Page [Codeless]
Defining Modules and Widgets in Codeless
How to Setup Modules, Manage their Options, and Build Module Presets [Codeless]
Customizer: Adding Photos to Pages and Blog Posts [Codeless]
Customizer: Adding Videos to Pages and Posts [Codeless]
Agent Manager (Office Builder)
New Agent Manager Features
Assigning Leads from your Brokerage site to your Agents using Agent Manager
Removing an Agent from your Office Builder Account
Adding/ Creating New Agent using Agent Manager
Resolving Conflicts
Deactivating an Agent Website using Agent Manager
Assigning/ Unassign & Changing Agent Site Feature using Agent Manager
How to check an Agent Website Status on Agent Manager
Offices Feature using Agent Manager
Office Builder Plan - Features
Bulk Agent Invitation via .CSV
Providing Admin Access for Broker Agent using Agent Manager
Launching Agent Site Feature using Agent Manager
Publish feature for Agents using Agent Manager
Duplicating an Agent Website using Agent Manager
DIFM
Agent Manager Feature - DIY/ DIFM Subscription
Active Agent Pricing -DIY/ DIFM Subscription
Requesting for a DIFM task and getting in touch with your Creative Assistant
IDX Support Fee- DIY/DIFM Subscription
Admin Access
- All Categories
-
- Enabling Social Login - Google
Enabling Social Login - Google
 Updated
by Katherine Ramirez
This article will show you how to configure your Google app and enable Google Login and Register on your Placester site.
You may now enable login and registration for your customers by only using their Google account. This will simplify their registration and login process.
To enable Google Login and Register on your Placester site, you first need to configure your Google App.
- Go to https://console.developers.google.com/apis/
- Log in with your Google credentials.

- If you don’t have any projects, you’ll need to create one first. You can do this by clicking on the blue “Create Project” text on the right side.

- Name your project and click on the “Create” button.

- Once you have a project, you’ll end up in the project dashboard.

- Now click the "APIs & Services" then click the “OAuth consent screen” button on the left.

- Choose a User Type according to your needs and press “Create”. If you want to enable the social login with Google for any users with a Google account, pick the “External” option.

- Enter the name of your App in the “App name” field - it will be visible to your users when they will try to sign up on your Placester site! We recommend using the title of your site.


- For the “User support email” field, select an email address that users can use to contact you with questions about their consent - we suggest using the same one as the one visible on your site.

- Under the “Authorized domains” section, press the “Add Domain” button and enter your domain name, e.g.: example.com.

- In the “Developer contact information” section, enter an email address that Google can use to notify you about any changes.

Press “Save and Continue”, and then press it again on the “Scopes” and “Test users” pages!
- On the left side, click on the “Credentials” menu, then click the “+ Create Credentials” button in the top bar.

- Choose the “OAuth client ID” option.

- Select the “Web application” under the Application type. Enter a “Name” for your OAuth client ID.

- Under the “Authorized Javascript Origins” sections, click “Add URI” and add https://[yourwebsiteURL]

- Under the “Authorized redirect URIs” section, click “Add URI” and add https://[yourwebsiteURL]/social-login?google. ( Note: You will add your active domain name/the one you're using on your website)
Click on the “Create” button

- A modal should pop up with your credentials. If that doesn’t happen, go to the Credentials in the left menu and select your app by clicking on its name, and you’ll be able to copy-paste the “Client ID” and “Client Secret” from there.

- Now update fields “Client ID and “Client Secret” in the Customizer.
- At this time, your App will be in testing mode, so only a limited number of people can use it. To allow this App for any user with a Google Account, click on the “OAuth consent screen” option on the left side, then click the “PUBLISH APP” button under the “Publishing status” section, and finally press the “Confirm” button.

Logging in to Placester https://app.placester.com/login?

Continue with Google
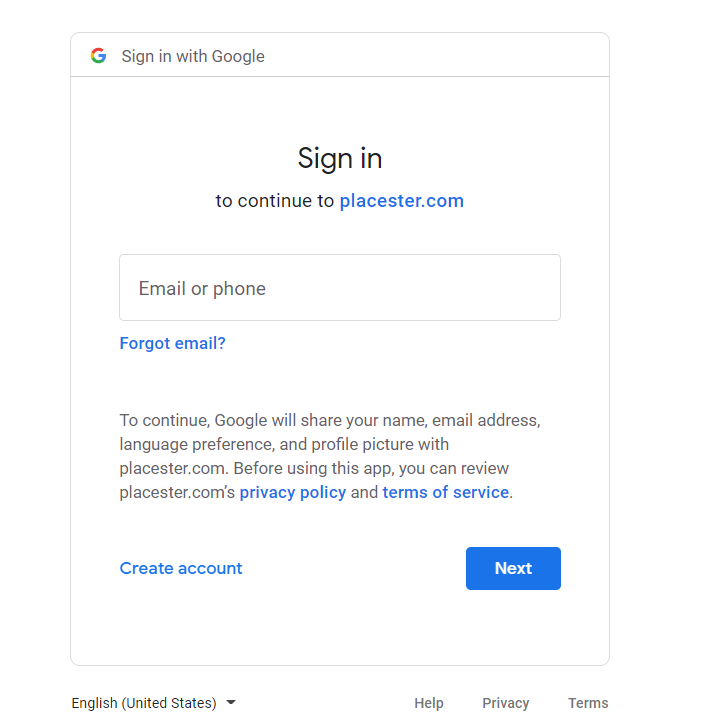
If you choose to continue with Google, it will bring you to the Google sign-in page where you will be asked to provide your Google email address and password.

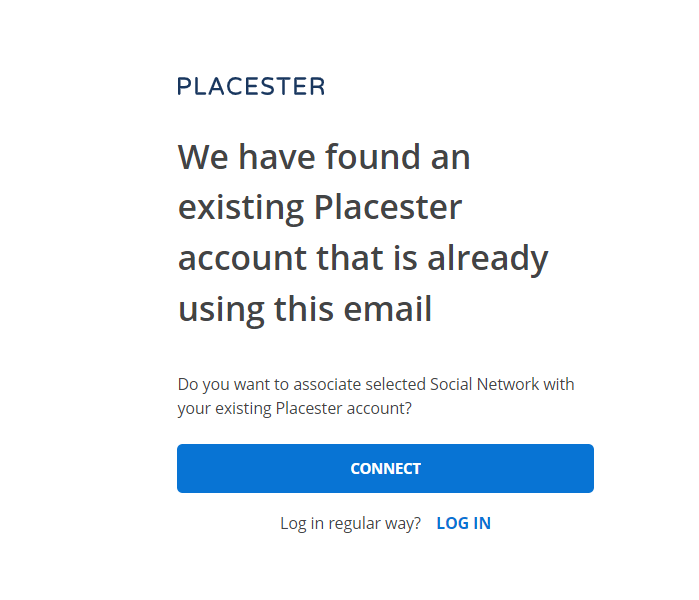
It will bring you to a page where it will ask you to connect your Google account with your Placester account.

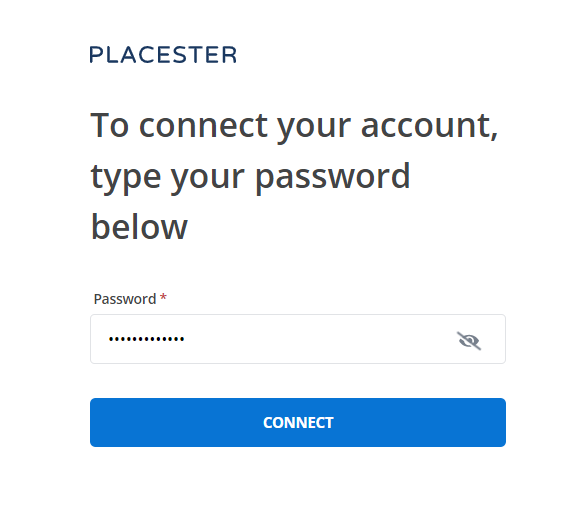
Lastly, it will ask you to put in your Google password before it will log you into your Placester account.

How did we do?
Related Articles

Let experts do it for you
Visit our creative services marketplace to get on-demand help, on-time and on-budget.
Browse all Services
Are you looking for something different?
Didn't find an answer to your questions? Our support team is ready to help you.