Getting Started
Classic
Logging into your Placester Account [Classic]
Requesting an IDX Integration [Classic]
Editing Your Contact Details [Classic]
Changing Themes and Colors [Classic]
Adding Images to your Home Slideshow [Classic]
Adding a Favicon [Classic]
Linking Social Networks [Classic]
Adding Certification Logos to the Footer of your Site [Classic]
Changing your Global filter settings [Classic]
Using Basic Lead Capture [Classic]
Creating a Blog Post [Classic]
Creating Advanced Area Pages and an Area Page Index [Classic]
Creating a Page [Classic]
Adding a Logo [Classic]
Codeless
Getting Started Checklist
Requesting an IDX Integration [Codeless]
Logging into your Placester Codeless Account [Codeless]
Image Dimension Guide [Codeless]
Changing your Global filter settings [Codeless]
Editing Your Codeless Contact Details [Codeless]
Adding Images to your Home Slideshow [Codeless]
Featuring Listings on your Home Page [Codeless]
Adding Certification Logos to the Footer of your Codeless Website [Codeless]
Adding a Favicon [Codeless]
What is Codeless?
Updating Classic to Codeless Website
Non IDX Website
Social Feed ( Codeless )
Notification System in the Admin Panel
How to add JS Code to your Placester Website ( Codeless )
The Codeless Design Library and Design Switching
Placester's Web App
All Things IDX
Classic
TREC Requirements [Classic]
RightSignature Cheat Sheet
Adding Your License Number to Your Site [Classic]
Adding Multiple IDX feeds to your site [Classic]
Map Search [Classic]
Natural Language Search [Classic]
Selecting Search Forms [Classic]
Featuring Listings on your Home Page [Classic]
Basic Areas and Creating an Areas Index Page [Classic]
How Placester Handles 1/4, 1/2 and 3/4 Baths [Classic]
Codeless
How to fill out your IDX Documents on RightSignature.com
IDX Process: FAQ's
TREC Requirements [Codeless]
MLS Recommendations/ Updates
IDX Manager [Codeless]
Customizer: Requesting an IDX Integration [Codeless]
Adding Multiple IDX feeds to your site [Codeless]
IDX Support Fee
IDX Integration Removal
Setting Priority on Listings
Account, Subscription & Billing
Codeless
Updating Account Email
Placester Mobile App
Hiring a Creative Assistant Using On-Demand
Account Reactivation
Plan and Billing: Invoices & Accessing the Usage Trail
Updating Payment Details
How to Capture Leads
Customizing your Website
Classic
Custom Domain
How and Where to Purchase a Custom Domain
Pointing your Custom Domain to your Placester Site [Classic]
Editing your Placester Subdomain [Classic]
Forwarding Additional Domains to Your Website [Classic]
Mapping Your GoDaddy Domain to Placester (New User Interface) [Classic]
Mapping your Network Solutions domain to Placester [Classic]
Mapping your Register.com domain to Placester [Classic]
Mapping your Wix Domain to Placester [Classic]
Mapping your iPage Domain to Placester [Classic]
Mapping your Domain.com domain to Placester [Classic]
Mapping your Bluehost Domain to Placester [Classic]
Mapping your Name.com Domain to Placester [Classic]
Mapping your HostGator domain to Placester [Classic]
Mapping Your Domain vs. Forwarding With Masking [Classic]
Mapping your .REALTOR Domain to Placester [Classic]
Mapping your eNom domain to Placester [Classic]
Common Domain Mapping Issues & How to Resolve Them [Classic]
Mapping your DreamHost domain to Placester [Classic]
Mapping your Google Domain to Placester [Classic]
Mapping your Hover domain to Placester [Classic]
Mapping your Namecheap domain to Placester [Classic]
Mapping a Subdomain to your Placester Site [Classic]
Pages, Menus & Posts
Using the Featured Listings Page Template [Classic]
Editing an Existing Blog Post [Classic]
Adding Photos to Pages and Posts [Classic]
Editing Your Menu [Classic]
Adding Featured Content Tiles [Classic]
Adding a blog post to a category [Classic]
Scheduling Blog Posts [Classic]
Choosing Testimonial Featured images [Classic]
Page Templates [Classic]
Editing an Existing Page [Classic]
Using Formatting Options on Pages and Posts [Classic]
Adding Videos to Pages and Posts [Classic]
Advanced Page Editing [Classic]
Creating a coming soon page [Classic]
Adding HTML to a Page [Classic]
Adding a Menu Item that links to a Custom URL [Classic]
What to Include in your About page [Classic]
Home Valuation Page [Classic]
Creating a Custom Landing Page [Classic]
Creating a Testimonials Page [Classic]
Theme Guides
Sedona Theme Guide [Classic]
Chicago Image Dimension Guide [Classic]
Franklin Theme Guide [Classic]
Toronto Theme Guide [Classic]
Phoenix Theme Guide [Classic]
Beacon: Image Dimension Guide [Classic]
Wilshire: Image Dimension Guide [Classic]
Plymouth Image Dimensions Guide [Classic]
How Many Featured Listings and Blog Posts Are Displayed on Each Theme's Home Page? [Classic]
Fremont Theme Guide [Classic]
Highland Image Dimensions Guide [Classic]
Newbury: Image Dimension Guide [Classic]
Recommended Logo Sizes for Each Theme
Lexington: Image Dimension Guide [Classic]
Best Practices
What Should My Slideshow Captions and Links Be? [Classic]
What's Important To Feature In Your Menu [Classic]
Adding your Google Analytics Tracking Code [Classic]
Adding your Google AdWords Conversion Label and ID [Classic]
Adding a Video Link to Your Home Slideshow [Classic]
What To Do After Your Site Is Live [Classic]
How and Why to Add Excerpts to Pages [Classic]
Adding a Facebook Pixel to your Placester Site [Classic]
Submitting your Sitemap to Google
Site Verification for Google, Pinterest, and Bing [Classic]
Adding a Meta Description & Meta Title to your Home Page [Classic]
Adding a Meta Title & Meta Description to Pages and Posts [Classic]
Pro Tips
Writing Your First Blog Post [Classic]
How to Embed a Google Calendar onto your Placester Site [Classic]
Selecting Great Slideshow Images and Where to Find Them [Classic]
How To Create a "Join our Team" Page [Classic]
How to Use Social Networks for Real Estate [Classic]
Adding Social Networks ( Classic)
Which Lead Capture Setting is Best For You? [Classic]
How to optimize SEO on your Placester Site
Removing "For Rent" From Your Search Bar [Classic]
Tips and Resources for Cropping and Resizing Images [Classic]
Sharing Blog Posts on Social Media [Classic]
How to Clear Your Cache [Classic]
How Can I Drive Traffic To My Site?
Account
Codeless
Pages, Menu and Posts
Creating a Testimonials Page [Codeless]
Managing Property Details Page
Integrating Your Real Satisfied Account [Codeless]
Creating new testimonial [Codeless]
Accessibility Widget [Codeless]
Open Houses- Module, Widget and Page Template
Adding a Menu Item that links to a Custom URL [Codeless]
Scheduling Blog Posts [Codeless]
Home Valuation Page [Codeless]
How to create an About Page [Codeless]
Adding Modules to Pages, Areas, Agents, Blog post, Offices and Testimonials
Create and Manage Agent Groups in your Agent Index page
Custom pages for recent sales/open houses (Codeless)
Market Data on Area Pages
Sold Listings
How To Hyperlink Text And Images
Adding a Blog Post to a Category [Codeless]
Using Featured Listings Page Template [Codeless]
Advanced Page Editing [Codeless]
Map Search ( Codeless)
Codeless Coming Soon Listing Page [Codeless]
Creating Advanced Area Pages and an Area Page Index [Codeless]
Creating a Custom Landing Page [Codeless]
Choosing Testimonial Featured images [Codeless]
Editing an Existing Blog Post [Codeless]
Adding a Button to a Page [Codeless]
Creating a Contact Page ( Codeless )
Property Landing Page
Editing Your Navigation Bar [Codeless]
Using Formatting Options on Pages and Posts [Codeless]
Adding Your Facebook App ID [Codeless]
Switching Website Design [Codeless]
Adding Featured Content Tiles [Codeless]
Page Templates [Codeless]
Tips and Resources for Cropping and Resizing Images [Codeless]
Custom Domain
How and Where to Purchase a Custom Domains [Codeless]
Common Domain Mapping Issues & How to Resolve Them [Codeless]
Pointing your Custom Domain to your Placester Site [Codeless]
Forwarding Additional Domains to Your Website [Codeless]
Mapping Your Domain vs. Forwarding With Masking [Codeless]
Editing your Placester Subdomain [Codeless]
Nameservers vs DNS Settings
Mapping your HostGator domain to Placester [Codeless]
Mapping your Register.com domain to Placester [Codeless]
Mapping your DreamHost domain to Placester [Codeless]
Mapping your iPage Domain to Placester [Codeless]
Mapping your Domain.com domain to Placester [Codeless]
Mapping your Hover domain to Placester [Codeless]
Mapping your Google Domain to Placester [Codeless]
Mapping your Network Solutions domain to Placester
Mapping your Wix Domain to Placester [Codeless]
Mapping a Subdomain to your Placester Site [Codeless]
Mapping your Name.com Domain to Placester [Codeless]
Mapping your .REALTOR Domain to Placester [Codeless]
Mapping your Namecheap domain to Placester [Codeless]
Mapping your eNom domain to Placester [Codeless]
Mapping your Bluehost Domain to Placester [Codeless]
Mapping your CloudFlare domain to Placester [Codeless]
Font Style and Size
Leveraging Placester's Simple CRM
Classic
Viewing and Editing Leads
Manually Adding a Lead [Classic]
Removing a Lead [Classic]
Editing your Leads individually and through Bulk Actions [Classic]
Viewing Your Leads [Classic]
Lead Management
Exporting Leads [Classic]
Managing Duplicate Leads [Classic]
What Can Site Visitors Do With an Account? [Classic]
CRM: Managing Custom Views [Classic]
Creating Saved Searches for your Leads [Classic]
Routing Leads From Other Sources to Your Placester Account
Importing Leads [Classic]
How to Add Tags to Leads and Contacts [Classic]
Creating Groups
Adding a Note to a Lead [Classic]
Creating / Managing Tasks (In Leads) [Classic]
How Leads Can Create Saved Searches [Classic]
Using Plans
Creating a Custom Signature [Classic]
Editing a Plan Email Template [Classic]
Creating and Managing Your Email Blasts [Classic]
Editing a Plan [Classic]
Adding single or multiple leads to a plan [Classic]
Creating a New Email Template [Classic]
Creating a New Drip Campaign [Classic]
Broker Features
Codeless
Viewing Your Leads [Codeless]
4.0 Editing your Leads individually and through Bulk Actions [Codeless]
Manually Adding a Lead [Codeless]
4.0 Removing a Lead [Codeless]
Importing Leads [Codeless]
Managing Duplicate Leads [Codeless]
Exporting Leads [Codeless]
4.0 Adding a Note to a Lead [Codeless]
How to Add Tags to Leads and Contacts [Codeless]
Creating Saved Searches for your Leads [Codeless]
How Leads Can Create Saved Searches [Codeless]
Editing a Plan [Codeless]
Creating a New Email Template [Codeless]
Adding single or multiple leads to a plan [Codeless]
Autoresponders
Creating and Managing Your Email Blasts [Codeless]
Creating a New Drip Campaign [Codeless]
What Can Site Visitors Do With an Account? [Codeless]
CRM: Managing Custom Views [Codeless]
New Placester CRM
SEO Capabilities
Codeless: Manual assigning of Leads to Agents
Setting up Integrations
Classic
Codeless
Accessing RealSatisfied Account
Linking Social Networks [Codeless]
What is Zapier?
How to Integrate Your Placester Account With Zapier
Integrating Your Local Logic Account
Follow Up Boss - Placester Integration
Integration: Custom API
TotalBrokerage - Placester Integration
Advanced Website Customization
Classic
Lead Text Notifications Using Gmail [Classic]
Embedding A PDF or File To A Page [Classic]
Custom pages for recent sales/open houses [Classic]
Adding a GIF To Your Home Slideshow [Classic]
Tricks for Speeding up a Slow Website [Classic]
Adding Facebook Messenger to your site [Classic]
Adding a Chat Widget to Your Site [Classic]
Adding a Google Maps location to your Contact page [Classic]
Adding a Logo to Your Site's Footer [Classic]
Adding Google Tag Manager [Classic]
Codeless
Search: Autosuggest Results
Placester Live Chat Feature
Embedding A PDF or File To A Page [Codeless]
Adding Google Tag Manager (Codeless)
Site Verification for Google, Pinterest, and Bing [Codeless]
Lead Text Notifications Using Gmail [Codeless]
Adding Animations to Your Design Modules in Codeless
Overlay management
Custom Property Page Banner
How to Resize and Crop Headshots [Codeless]
Custom Banner
Sign In/ Sign Up Forms
Cookie Banner
Advanced Broker Customization
Classic
Creating an Agents Page [Classic]
Creating an Agents Roster Page on Your Office Site [Classic]
How To Order Agents within your Agent Index Page [Classic]
Creating an Office Page using Customizer [Classic]
Codeless
NAR Edition
General
NAR Edition: Editing the About page
NAR Edition: Global filters
NAR Edition: Adding a Testimonials Page
NAR Edition: Blog Posts
NAR Edition: Pointing Your Custom Domain To Your Placester Site
NAR Edition: Adding Certification Logos to the Footer of Your Site
NAR Edition: Chicago vs. Highland
NAR Edition: Viewing Your Slideshow
Highland Theme
NAR Edition's Highland Theme: Editing Contact Details
NAR Edition's Highland Theme: Featured Listings
NAR Edition's Highland Theme: Editing An Area Page
Chicago Theme
Other Topics
Compliance
Customizer
Customizer: Creating a Blog Post [Codeless]
Adding a Facebook Pixel to your Placester Site (Codeless)
Customizer: Adding your Google Analytics Tracking ID, AdWords Conversion Label and ID [Codeless]
Customizer: Using Custom Lead Capture[Codeless]
Customizer: Adding a Chat Widget to Your Site [Codeless]
Customizer: Editing an Existing Page [Codeless]
Customizer: Mapping your GoDaddy Domain to Placester [Codeless]
Leveraging Video Modules on Your Codeless Website
How to add your Logo to the Header & Footer [Codeless]
Customizer: Adding HTML to a Page [Codeless]
Customizer: Creating a New Page [Codeless]
Customizer: Adding a Meta Description & Meta Title to your Home Page [Codeless]
Defining Modules and Widgets in Codeless
How to Setup Modules, Manage their Options, and Build Module Presets [Codeless]
Customizer: Adding Photos to Pages and Blog Posts [Codeless]
Customizer: Adding Videos to Pages and Posts [Codeless]
Agent Manager (Office Builder)
New Agent Manager Features
Assigning Leads from your Brokerage site to your Agents using Agent Manager
Removing an Agent from your Office Builder Account
Adding/ Creating New Agent using Agent Manager
Resolving Conflicts
Deactivating an Agent Website using Agent Manager
Assigning/ Unassign & Changing Agent Site Feature using Agent Manager
How to check an Agent Website Status on Agent Manager
Offices Feature using Agent Manager
Office Builder Plan - Features
Bulk Agent Invitation via .CSV
Providing Admin Access for Broker Agent using Agent Manager
Launching Agent Site Feature using Agent Manager
Publish feature for Agents using Agent Manager
Duplicating an Agent Website using Agent Manager
DIFM
Agent Manager Feature - DIY/ DIFM Subscription
Active Agent Pricing -DIY/ DIFM Subscription
Requesting for a DIFM task and getting in touch with your Creative Assistant
IDX Support Fee- DIY/DIFM Subscription
Admin Access
Table of Contents
- All Categories
- Other Topics
- Customizer
- How to Setup Modules, Manage their Options, and Build Module Presets [Codeless]
How to Setup Modules, Manage their Options, and Build Module Presets [Codeless]
This article will show you how to use modules on your website in an efficient and consistent way
Modules are the website components that will help you to build your website. Our modules can look different on different Designs, because we have plenty of options to manage their appearance. Advanced styling options associated with modules are available for everyone on the Advanced subscription or above.
Building up a homepage.
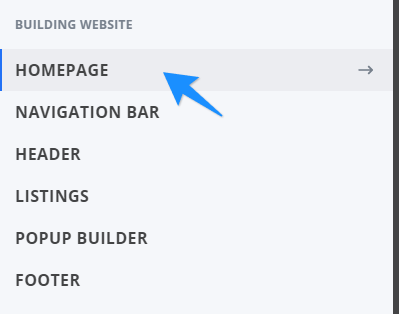
To customize your main page with modules, go to the HOMEPAGE tab.
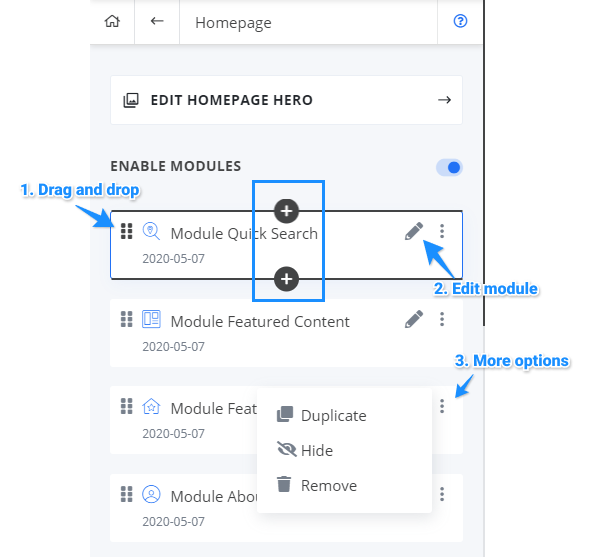
You can add additional modules by using the appearing plus icon. To change their order, drag and drop above or below. A specific module can be edited by clicking the pencil icon both in the Customizer, and on the preview. You can easily duplicate, hide or remove your modules.
Types of modules
We have prepared many different modules to meet the needs of all the real estate professionals. You are the one to decide on their appearance and arrangement. Don’t be afraid to experiment with the look of your brand-new website!

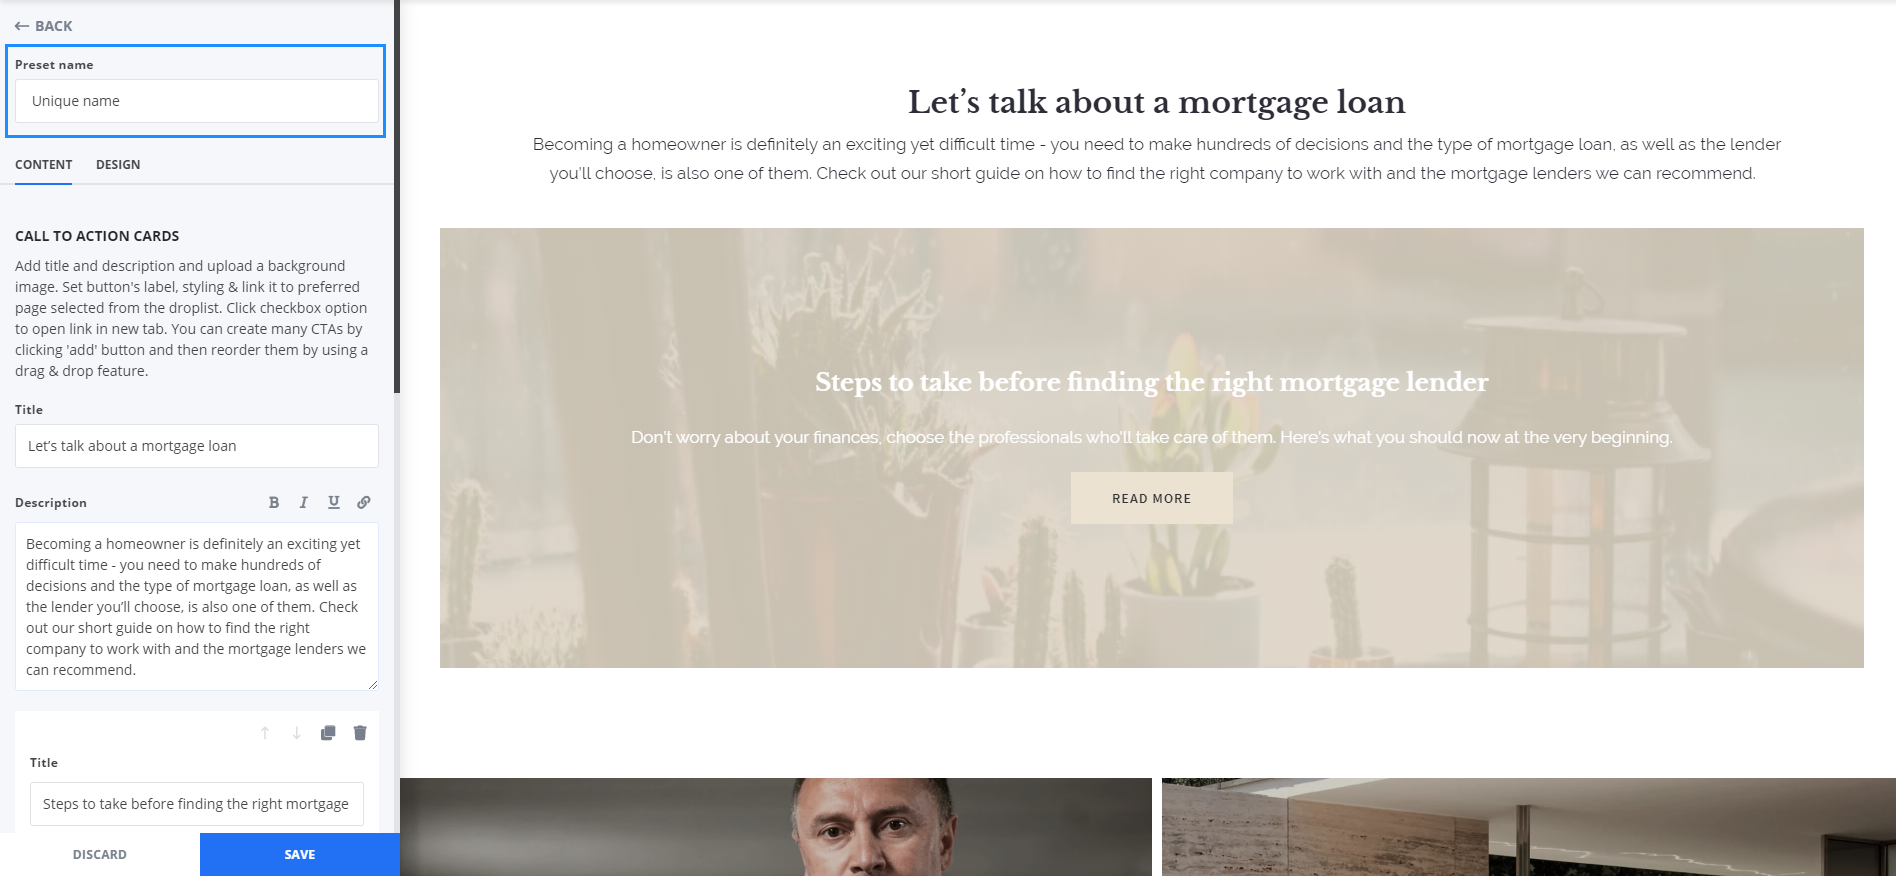
Each module has its standard settings such as TITLE, DESCRIPTION, or CONTENT CARDS with a photo. Fulfill it, and don’t forget to use the unique preset name to be able to easily manage this module and add it to any subpage later in the process.
Advanced module options for
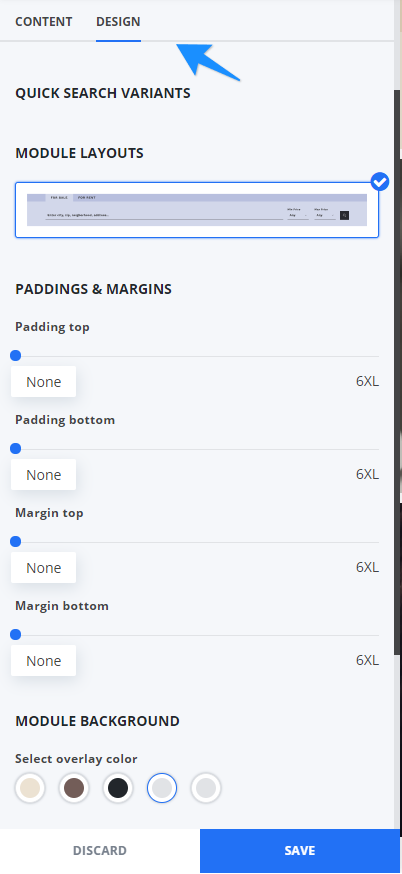
You can gain access to the advanced module options through the DESIGN tab, which is visible while you’re editing your module. In there, you can change the layout, margins, background, and more.
Using presets
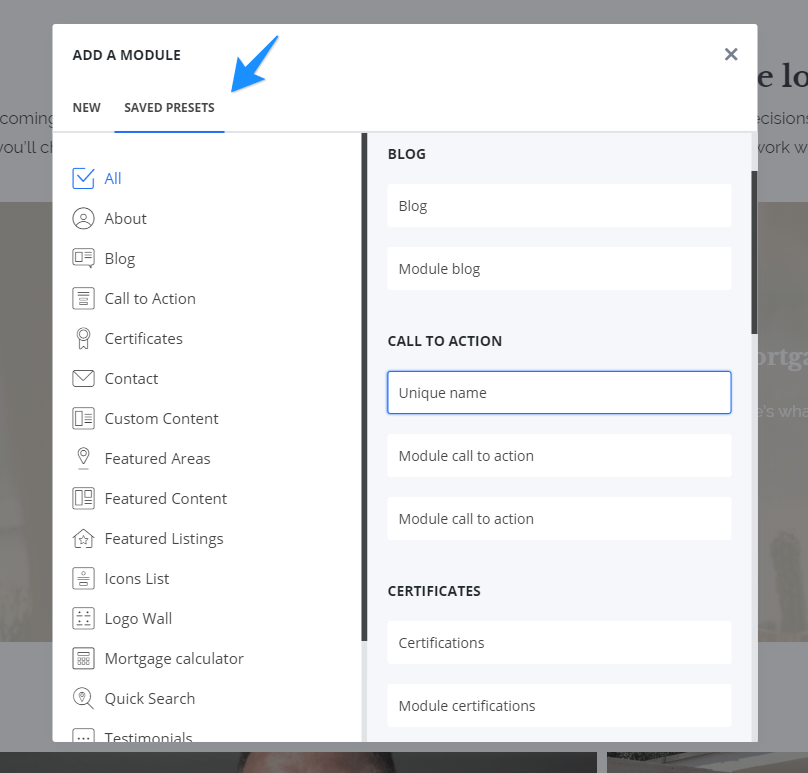
If you want to use a module that you have already created before, select the SAVED PRESETS tab. There you’ll find all your previously created modules with your special sets of options and of course, their unique content. You’re free to use them on any subpage of your website.
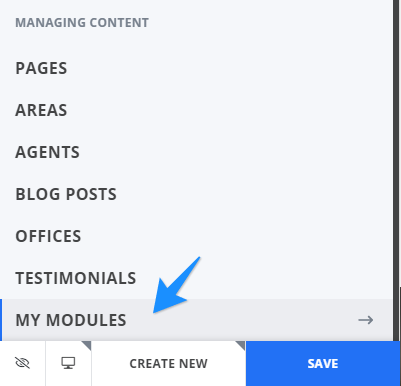
To manage your presets, go to the MY MODULES section.
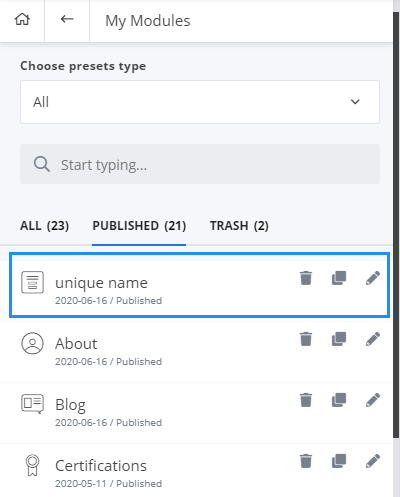
Here you can directly edit the presets of your modules. After doing this, this particular preset of the module will change in all the places across your website. That’s why you should be very careful while working with your presets! In this section,you can also delete or duplicate certain module presets.Thanks to this, you’re able to fully manage them in one place, without a need to visit every single page individually. Adding modules to all the pages.
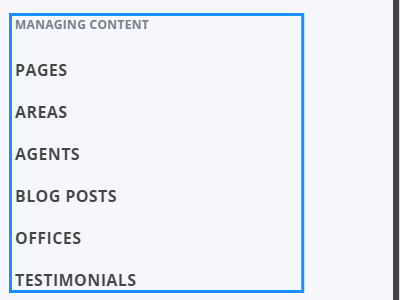
You can add your modules to the whole content groups PAGES, AREAS, AGENTS, BLOG POSTS, OFFICES or TESTIMONIALS. After this, chosen modules will appear on all the singles in this particular group. In order to do this, choose the group of content in the MANAGING CONTENT section, that you’re interested in.
Next, go to MODULES & WIDGETS.
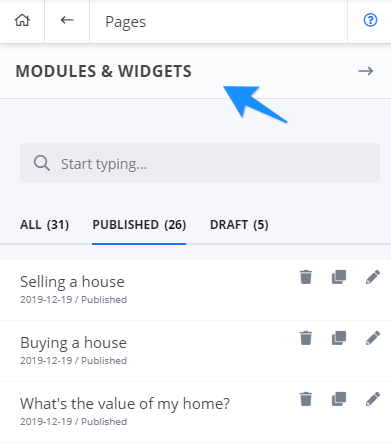
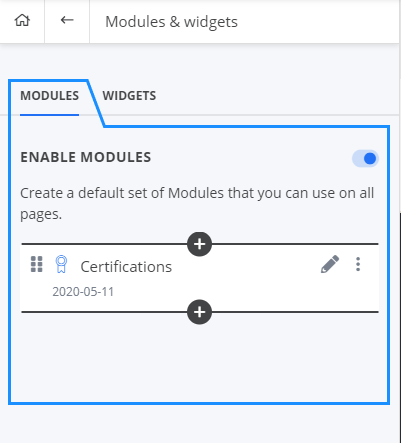
Here, you can finally choose which modules you want to use on certain pages. You can also edit and add them in a very similar way, in which you were doing this on your homepage.
Adding modules to a single page.
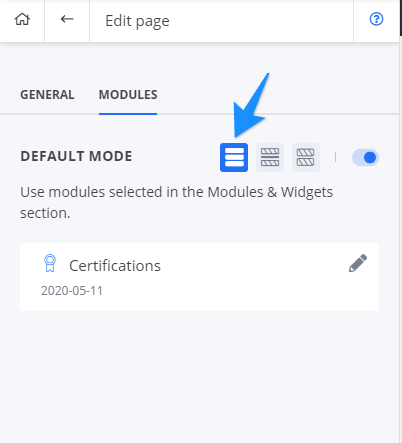
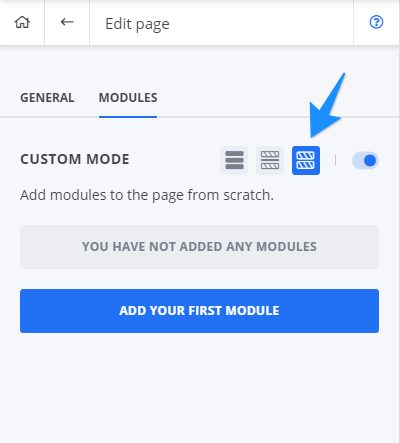
This particular feature is great if you have a special page, on which you want to build your modules individually, or you don’t want to use them at all. To do so, while editing your page, click the MODULES tab. You’ll see the three icons which are visible on the screen below.
DEFAULT MODE uses global settings for all pages.
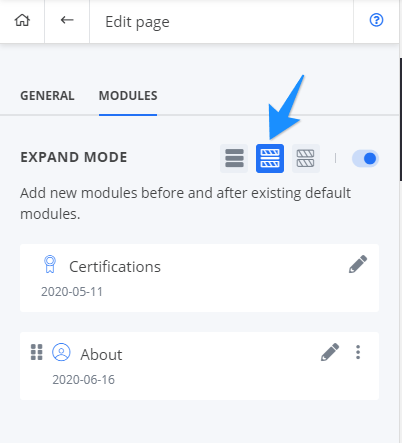
EXPAND MODE
allows you to add additional modules below and above those which come from the default options.
CUSTOM MODE
In Custom Mode, it doesn’t matter what has been set globally, you have full freedom.
Need more help?
For questions, concerns or feedback, please chat with our team:https://app.placester.com/chat
How did we do?
Defining Modules and Widgets in Codeless
Customizer: Adding Photos to Pages and Blog Posts [Codeless]
Related Articles

Let experts do it for you
Visit our creative services marketplace to get on-demand help, on-time and on-budget.
Browse all Services
Are you looking for something different?
Didn't find an answer to your questions? Our support team is ready to help you.